I was in a crafty mood today, but I didn't have any idea what to do. It was a babysitting day, so whatever I decided had to be something 2- and 4-year-olds could handle. I went to one of my favorite crafty blogs, www.simplemessyfun.com, to see if the author had posted anything new I could use. Sure enough, she had: solar-powered nightlights. Stick them in a window during day-light hours to charge; put them in your child's bedroom at night for a soft, soothing light.
Apparently, this idea isn't new. Simplemessyfun's author found the idea on a different blog, and that blog's author had found it on yet another Web site. But the idea was new to me and looked like it had a lot of potential.
So I loaded up all four boys and the double stroller and went to the local home improvement store in search of supplies.
Supply list:
1. solar-powered garden lights
2. glass jars with a wide mouth (this idea might work with hand-punched soup cans too ...)
3. frost spray paint or translucent items to put in jar (glass beads/rocks, marbles, etc.)
4. some sort of adhesive - silicone caulk, hot glue, sticky tack, tacky strips (found them near the hot glue supplies), or glue dots

The main supplies: The jar, garden light and glass "rocks." I apologize for the blurry images - I grabbed my old point-and-shoot because it was handy and fast ...

The garden light is by the brand, "Yards and Beyond."

The tops of the solar lights.
I looked for the jars at Wal-Mart, but didn't find any. Hobby Lobby, however, came through with flying colors. The jars were 50 percent off this week. Since they started at $1.99, I got them for just $1 each. I also found a new product there I've never tried. It was a roll of clear adhesive strips advertised as an alternative to hot glue.

Zips Clear Adhesive Lines - a hot glue alternative
Since I was doing this project with young children, I picked up a roll to see if it would do the job. I ended up having to apply it around the rim of the jars myself because, boy, was it sticky. It did the job, though, was a lot less messy than hot glue, and resulted in a strong enough bond that the kids couldn't pry the "lid" off.
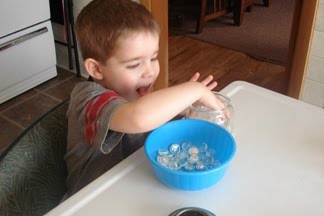
At Hobby Lobby, I also found the clear glass "rocks" normally used in fish tanks to fill the jars. I thought this was something a little more kid-friendly than using frosted spray paint.
The boys really enjoyed filling their jars with the glass rocks and thought the end result was just "way cool," according to my 4-year-old.
Instructions:
1. Paint outside of jar with "frosted glass" spray paint or fill with translucent material
2. Apply clear adhesive to rim of jar
3. Attach solar light
4. Set nightlight in window to charge and it will be ready to use by the evening!
Total cost: Approximately $8 for each light. Could be more or less depending on materials used.


The end result. Note: the solar light replaces the jar lid.

Illumination!
*** One word of caution: If you decide to fill the glass jars with something, instead of spray painting them, be sure to put them out of reach of very young children. If shaken too hard, the glass jar will break.
No comments:
Post a Comment